

Hari Iyer | SyncEzy
CEO 11 Min Read
 Jun 10, 2021

Sharing Procore files with others using OneDrive
In this post we’ll walk through the process for uploading documents to Procore and then sharing these files with non-Procore users (clients, contractors etc).
There are two common ways to upload files to Procore on your desktop, uploading via the Documents Tool and uploading files by sending an email. Let’s look at each method in depth.
Upload files or folders to Procore using the Documents Tool
- Navigate to the Documents tool.
- Click on the folder in the Documents tool that you want to upload files or folders to.
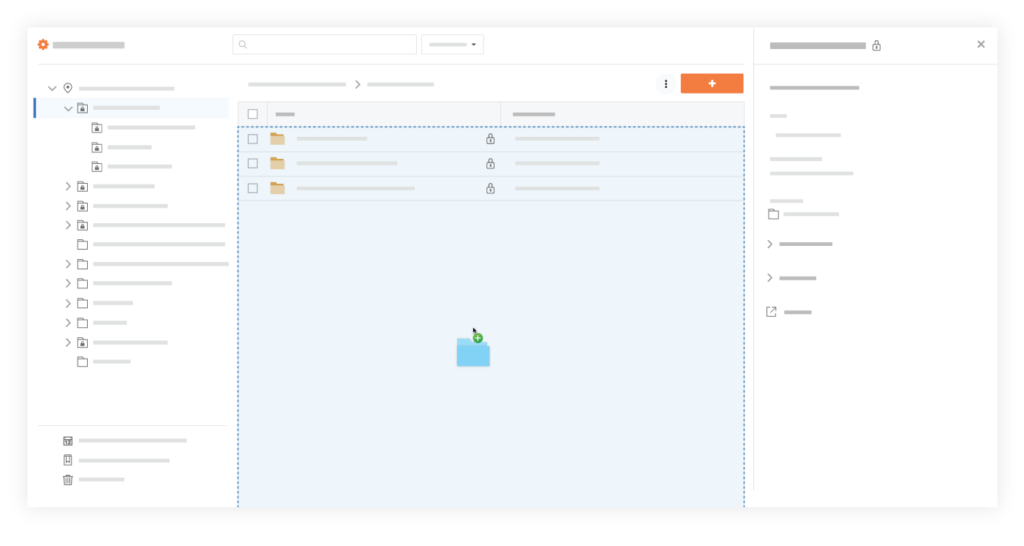
- After selecting files or folders on your computer, drag and drop them to the center panel of the Documents tool.
Tip! You can also use this method to upload empty folders from your computer instead of having to create the same folders manually in the Documents tool.
OR
- Click the + New drop-down menu.
- Choose whether you want to upload files or folders:
- Click File Upload to select files to upload.
- Click Folder Uploadto select folders to upload.
- Select the files or folders you want to upload from your computer.
Note: Empty folders cannot be uploaded during this step. They can only be uploaded using the drag-and-drop method shown above. - Click Open.
Notes:- A progress indicator is shown for each upload, and the system returns to the Documents tool page after the upload is complete.
- If you are uploading one or more files with the same filename as an existing file, you are prompted to choose whether you want to upload them as new versions, or rename the files.
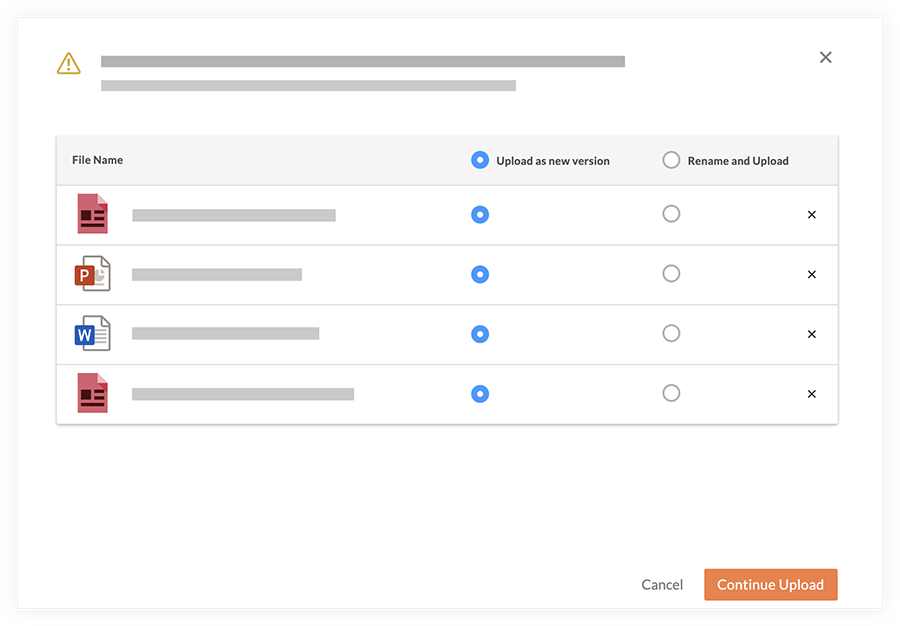
- Click Continue Upload.
Upload files to Procore by email
- Navigate to the Documents tool.
- Click the Configure Settings icon.
- The email address to email files to is listed in the ‘To Email Files To This Project’ section.

- 4. Create an email that is addressed to your Documents tool’s email address (mentioned above).
- 5. Attach any files you want to add to the Documents tool to the email. Note: The files will be uploaded to the ‘Emailed Documents’ folder.
Upload files to Procore on an Android phone
To upload files to your project’s Document tool using the Procore Android app on your mobile, follow these steps:
- Navigate to the project’s Documents tool using the Procore app on your Android mobile device.
- Optional: Tap the folder to which you want to upload a file.
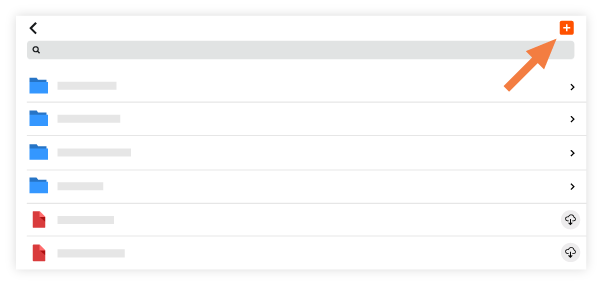
- Tap the plus
 icon.
icon. - Tap Upload File.
- Tap the hamburger (≡) button icon to select an app from which you want to upload a file.
Note: Selected files must be live on your device and not a cloud-based file. - Tap the file you want to upload.
Note: This action will automatically upload and save the selected file to the project’s documents tool.
Upload files to Procore on an Apple/iOS iPhone
To upload files to your project’s Document tool using the Procore iPhone app on your mobile, follow these steps:
- Navigate to the project’s Documents tool using the Procore app on an iOS mobile device.
- Tap the folder you want to upload a file to.
- Tap the + icon.
- Tap Upload File.
- Choose whether you want to take a new photo to add using the Camera feature, or add an existing file from your device through Attachments.
- Camera:
- Tap Camera to take a new photo.
- Press the shutter release icon to take the photo.
- Optional: Add markups using the markup toolbar.
- Tap Save.
- When you are finished taking photos to add to the Documents tool, tap Done.
- Attachments:
- Tap Attachments to upload an existing photo or file from your device.
- Choose whether you want to select photos from your device’s photo library, or files saved to your device’s Files app.
- Tap Choose from Library to select one or more photos from the photo library on your device.
Note: After you have selected the photos you want to add, tap Done.
OR - Tap Files to select items from the Files app on your device.
- Tap Choose from Library to select one or more photos from the photo library on your device.
- Camera:
- Optional: The following settings are available for your file upload.
- Track: If you want to track the file to be notified of any changes made, tap the ‘Track’ toggle ON.
- Private: If you want the file to be marked as Private, tap the ‘Private’ toggle ON.
- Tap Save.
Syncing your Procore to OneDrive
We offer a purpose-built integration between Procore and OneDrive that makes it easy for you to sync files from Procore into OneDrive.
The steps to getting started are:
- Register a SyncEzy Account here
- Find the Procore / OneDrive integration from the Integration library
- Subscribe to the Procore / OneDrive integration
- Authenticate Procore
- Authenticate OneDrive
- Complete the configuration steps
Sharing Procore folders with external users via OneDrive
Once you’ve connected Procore to OneDrive, you can share your Procore files via OneDrive by deciding how you want to share.
How do you want to share?
Select “copy a link to paste in a text message or on a website”
Choose this option to share items with lots of people you might not even know personally. Anyone who gets the link can view or edit the item, depending on the permission you set. Users with the link cannot upload new items. Keep in mind that the link can also be forwarded and sign-in is not required.
- Go to the OneDrive website and sign in with your Microsoft account or your work or school account.
Note: For OneDrive for work or school users not using Microsoft 365, try Share documents or folders in SharePoint Server. - Pick the file or folder you want to share by selecting the circle in the upper corner of the item. You can also pick multiple items to share them together (sharing multiple items at the same time is not available for OneDrive for work or school accounts).
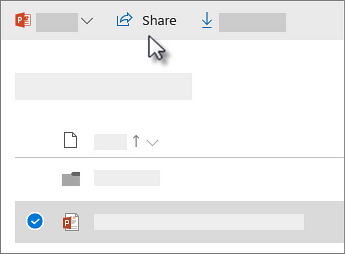
- Select Share at the top of the page.
- Select Anyone with the link can edit to customize the link options.
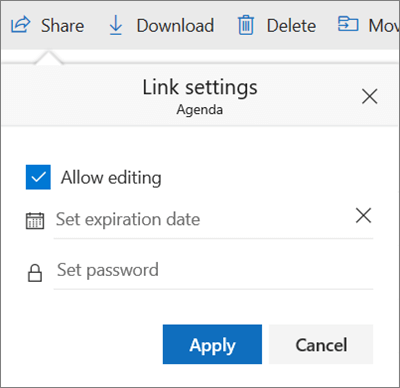
- Set the options you want on your link, then select Apply when you’re done.
- Allow editing – When you share items with this type of link, people can edit files, and can add files in a shared folder if they’re signed in with a Microsoft account. Recipients can forward the link, change the list of people sharing the files or folder, and change permissions for recipients. If you’re sharing a folder, people with Edit permissions can copy, move, edit, rename, share, and delete anything in the folder.Unchecking this box means that people can view, copy or download your items without signing in. They can also forward the link to other people. However, they cannot make change to the version on your OneDrive.Set expiration date – The link will only work until the date you set. After that, the link will be invalid, and you will need to create a new link for users requiring access to your file or folder.Set password – When a user clicks the link, they will be prompted to enter a password before they can access the file. You’ll need to provide this password separately to users.
 OneDrive for work additional optionsOneDrive for work users also have the option to restrict the level of access (anyone with the link, only people within your organization, only people with existing access to the file, or only individuals you specify). Also, if you opt to disable editing, you can also opt to prevent viewers from downloading the file.
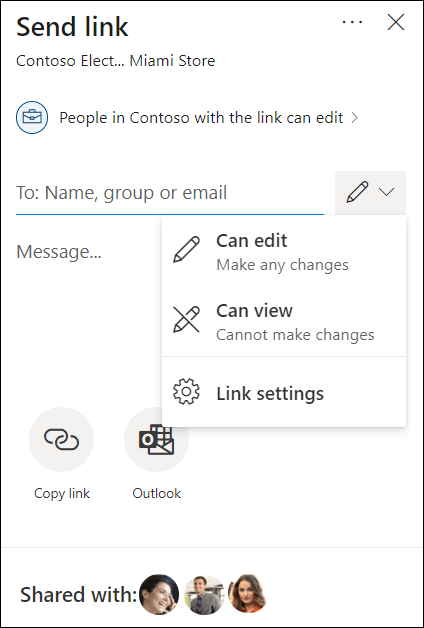
- Anyone gives access to anyone who receives this link, whether they receive it directly from you or forwarded from someone else. This may include people outside of your organization.People in <Your Organization> gives anyone in your organization who has the link access to the file, whether they receive it directly from you or forwarded from someone else.People with existing access can be used by people who already have access to the document or folder. It does not change the permissions on the item. Use this if you just want to send a link to somebody who already has access.Specific people gives access only to the people you specify, although other people may already have access. If people forward the sharing invitation, only people who already have access to the item will be able to use the link.Allow editing – When you share items with this type of link, people can edit files, can add files in a shared folder, and can delete files in a shared folder if they’re signed in. Recipients can forward the link, change the list of people sharing the files or folder, and change permissions for recipients. If you’re sharing a folder, people with Edit permissions can copy, move, edit, rename, share, and delete anything in the folder.By default, Allow editing is turned on. If you want people to only view your files, uncheck the check box. With OneDrive for work accounts, you can also quickly select editing permissions without having to open the sharing link settings. Simply select the pencil icon next to the Name, group or email box, then give the recipients edit or read-only permission. If you want to select or modify more options, select Link settings to access the additional options. Note that new Microsoft 365 features are rolled out over a period of time to all subscribers so you may not see Link settingsright away, but you can expect it to come to your device soon
- .
- Once you’re back at the main Share box, select Copy Link to copy the link to your clipboard.
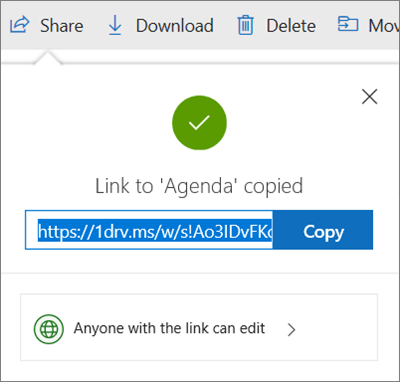
- Paste the link in an email message or wherever else you’re sharing the link.
Tip: You can also generate sharing links through the OneDrive desktop app for Windows 7, Windows 10, and Mac. All you need to do is right-click the file or folder in your OneDrive folder on your computer, and select Share a OneDrive link. This will copy a link to your clipboard that you can paste into an email, website, blog post, and so forth.
However, these links are set by default to Edit permission. If you only want someone to have View permission, you’ll need to use the OneDrive website to generate the link (or modify the one you just created).
Sharing folders
When you share folders with Edit permissions, people you share with can add the shared folders to their own OneDrive. This lets them keep the folder alongside their own folders and items, easily move items between folders, and more easily work on it offline. Any updates they make sync with the shared folder, so everyone with access to the folder is up to date.
Tip: The recipient can add shared folders to their OneDrive, not individual files. If you want the recipient to add files to their OneDrive, put the files in a folder first, and then share the folder.
Sharing with the OneDrive mobile apps
To share your Procore files via OneDrive mobile apps, see these helpful articles:
- Share files in OneDrive for Android
- Share files in OneDrive for iOS
- Share files in OneDrive for Windows mobile devices
Need help getting started?
If you’re unsure on the best way to set up your Procore file-sharing and the workflows / permissions that make sense for your company, get in touch with our helpful sales team to discuss your unique needs.
Author
Hari Iyer | SyncEzy
CEO

Hari Iyer is the Founder and CEO of SyncEzy, a pioneering company at the forefront of data integration and automation solutions. With a deep understanding of the power of technology and a passion for solving complex business challenges, Hari has emerged as a visionary leader in the industry. His relentless pursuit of excellence and commitment to delivering tangible results have earned SyncEzy a loyal global clientele.
He is not only a successful entrepreneur but also an active contributor to the technology community, sharing his insights through thought leadership articles, speaking engagements, and mentorship programs. Hari’s ability to navigate the complexities of remote work serves as an inspiration for leaders, highlighting the importance of flexibility, work-life balance, and a results-oriented approach in today’s evolving work landscape.
Under his guidance, SyncEzy has gained widespread recognition for its deep integration solutions that seamlessly connect software applications, eliminate data silos, and enhance operational efficiency.
When not working, Hari is trying to be a better father, reading tech news, playing FPS games, and not exercising as he should.
Related Posts


SyncEzy Enhances Capabilities with Autodesk Construction Cloud Integration
The new two-way integration between Autodesk Construction Cloud and Microsoft SharePoint by SyncEzy streamlines project management and enhances collaboration for construction teams. SyncEzy recently announced its latest integration with Autodesk Construction Cloud, significantly enhancing project management capabilities for its customers. This SharePoint integration is designed to improve efficiency and collaboration in construction projects, offering a… Continue reading SyncEzy Enhances Capabilities with Autodesk Construction Cloud Integration
Hari Iyer | SyncEzy
CEO
Understanding Procore Emails
For most office staff, email management is one of the most important tasks they perform each day. In this article, we’ll look at how emails work in Procore and how you can: Procore Emails Send an email with an attachment from Procore The Emails tool in Procore lets you perform basic email functions, such as… Continue reading Understanding Procore Emails
Hari Iyer | SyncEzy
CEO
Understanding Procore Downloads
Procore Downloads As a Procore user, you’re going to need to download files from Procore on your desktop or mobile. You might want to download the Procore files so you can mark them up, import into another software program, post to a group chat or email to a colleague. In this article, we’ll look at… Continue reading Understanding Procore Downloads
Hari Iyer | SyncEzy
CEO
Understanding Procore Documents
Procore’s Company level Documents tool is one place to house your organization’s mission-critical documents. Designed to accelerate business efficiency, this tool minimizes the amount of time it takes to capture, distribute, and share documents with your team. In this article, we’ll look at how companies are using this construction document management software and the smart… Continue reading Understanding Procore Documents
Hari Iyer | SyncEzy
CEO
odrive Alternative
For companies looking to connect Procore to their cloud storage provider, there are only a few major players in the Procore integration space. odrive is a service that enables you to integrate with Procore and “connect” your files to odrive. The way the connection works is: By having all your file as links to be… Continue reading odrive Alternative
Hari Iyer | SyncEzy
CEO
Why should I use software integrations in my construction business?
We explore how to drastically increase project efficiency and accountability by streamlining and mobilizing project communications and documentation. This real-time data and accessibility minimizes costly risks and delays—ultimately boosting profits. Historically, construction efficiency has been a common problem. This causes a project to drag out for a longer period of time and drives the prices… Continue reading Why should I use software integrations in my construction business?
Hari Iyer | SyncEzy
CEO