Hari Iyer | SyncEzy
CEO8 Min Read
Nov 15, 2022

Part of your work in Procore is taking photos on your mobile phone or tablet and then needing to upload the file into Procore. In this article, we’ll look at how to manage Photos in Procore, from your phone, all the way to the office.
Procore Photos
The common tasks that you’ll perform in Procore are:
- Creating a photo album on your mobile
- Take a photo and add it to your Procore album
- Add a comment or location to a photo
- Uploading photos to Procore Photos
- Moving photos within Procore Photos
- Creating a new album in Procore Photos
- Adding comments to a photo in Procore Photos
- Syncing your Procore photo albums with your cloud storage – Dropbox, Google Drive, OneDrive, SharePoint and Microsoft Teams
We’ll now look at how you can manage your team’s photos within Procore and within your cloud storage provider of choice.
Creating a Procore photo album on your mobile
To ensure all your photos are uploaded to the correct Procore Project, you will need to create an album on your mobile device or tablet:
- On an iPhone or iPad, the steps are found here.
- On an Android device, the steps are found here.
Take a photo and add it to your Procore photo album on your mobile
You’ve got an album set up for the correct project so your steps to take a photo and upload it to a Procore album on your mobile device or tablet:
- On an iPhone or iPad, the steps are found here.
- On an Android device, the steps are found here.
Add a comment or add the location to a Procore photo on your mobile
You might want to add a comment or add your location to your photo prior to uploading to Procore. The steps to do this on your mobile device or tablet are:
- To add a comment on an iPhone or iPad, follow these steps.
- To add your location on an iPhone or iPad, follow these steps.
- To add a comment on an Android device, follow these steps.
- To add your location on an Android device, follow these steps.
Uploading photos to Procore Photos (desktop)
Procore has a solid Photo tool that makes it easy to capture progress photos, add markups and other site photos. To upload photos on your desktop, follow these steps:
Drag-and-Drop Photos to Upload
- Navigate to your project’s Photos tool.
- Drag a photo from your computer’s file tree or desktop and drop it into the Photos tool anywhere on the page.
Note: Photos will be uploaded to the location in the Photos tool which you are viewing. - Fill out the fields in the upload modal as necessary.
- Date: This field will automatically populate with the dates that the photos were taken. If the capture information was not recorded when the photo was taken, the photos will default to today’s date.
- Location: Select a location associated with the photo(s).
- Album: Select which album into which you want to upload the photos.
- Trade: Select the trade associated with the photo(s).
- Private: Mark the checkbox if you want to hide the photo(s) from anyone but users with ‘Admin’ level permissions on the Photos tool.
- Add to Daily Log: Mark the checkbox if you want these photos to be uploaded into the Daily Log for the day the photos were taken (or today’s date if capture information was not recorded).
- Click Upload Photos.
Select Photos to Upload
- Navigate to your project’s Photos tool.
- Click the Upload button.
- Browse your computer’s file tree.
- Select files from your local computer.
- Click Open.
- Fill out the fields in the upload modal as necessary.
- Date: This field will automatically populate with the dates that the photos were taken. If the capture information was not recorded when the photo was taken, the photos will default to today’s date.
- Location: Select a location associated with the photo(s).
- Album: Select which album into which you want to upload the photos.
- Trade: Select the trade associated with the photo(s).
- Private: Mark the checkbox if you want to hide the photo(s) from anyone but users with ‘Admin’ level permissions on the Photos tool.
- Add to Daily Log: Mark the checkbox if you want these photos to be uploaded into the Daily Log for the day the photos were taken (or today’s date if capture information was not recorded).
- Click Upload Photos.
Taking photos on your mobile or tablet and want them stored in a Procore album? To take photos & store them on your Apple device, follow these instructions. For an Android device, follow these instructions.
Once you’ve uploaded your photos, your photos will sync across to your cloud storage of choice so your team and non-Procore users can view them.
Moving photos within Procore Photos (desktop)
There are times when photos may need to be moved to another photo album. For example, when photos are emailed into Procore using a project’s unique email address (e.g. upload-1234-project-name@procoretech.com), they are automatically placed in the project’s ‘Unclassified’ folder. The email address is especially useful for giving project collaborators the ability to upload photos to a project, even if they do not have access to the project’s Photos tool. Additionally, photos uploaded from the mobile app will default to the ‘Unclassified’ album if another album is not selected. To move photos in Procore, follow these steps:
TO MOVE MULTIPLE PHOTOS
- Navigate to the project’s Photos tool.
- Locate the photos you want to move to another album.
- Hover over and mark the checkbox on each photo you want to select.
- Click the Bulk Actions drop-down menu.
- Click Bulk Edit.
- Click the drop-down menu under Album.
- Select the album you want to move the photos to.
- Click Update.
TO MOVE AN INDIVIDUAL PHOTO
- Navigate to the project’s Photos tool.
- Locate the photo you want to move.
- Click the photo to open it in the photo viewer.
- Click the vertical ellipsis
 icon.
icon. - Click Change Album.
- Select the album you want to move the photo to.
- Click Confirm.
Creating a new album in Procore Photos (desktop)
Need to create a new album that will sync across to your cloud storage of choice? Follow these instructions to create a new photo album in Procore on your desktop:
- Navigate to your project’s Photos tool.
- Click the Albums tab.
- Click the + Create Album button.
- Enter a name for the album.
- Click Create.
Need to create a Procore photo album on your mobile or tablet? To create a new album on your Apple device, follow these instructions. For an Android device, follow these instructions.
Once you’ve created your album, your album will sync across to your cloud storage of choice so your team and non-Procore users can view the photos in this album.
Adding comments to a photo in Procore Photos (desktop)
Want to add a comment to a photo in Procore and notify someone of the comment? Follow these steps on your desktop:
- Navigate to the project’s Photos tool.
- Click the photo you want to add a comment to.
- Click the information (i) icon if it is not already selected.
- Expand the ‘Comments’ section at the bottom of the Information section.
- Enter your comment in the text box that appears.
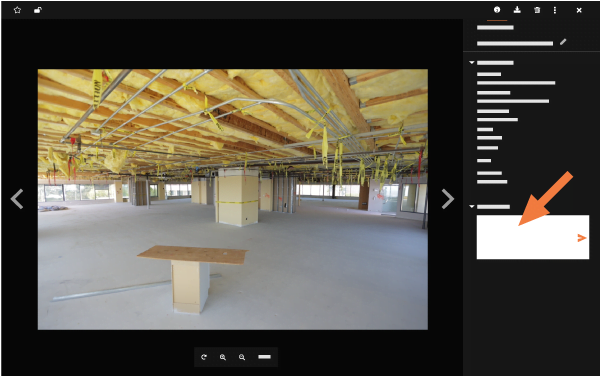 Note: You can also Mention Someone in a Photo Comment.
 - Click the Send arrow icon.
- Optional: You cannot edit a comment, but if you have ‘Admin’ permissions to the Photos tool, you can remove your comment by clicking the ‘x.’
Want to add a comment to a photo on your mobile or tablet? To add a comment on your Apple device, follow these instructions (or follow these instructions to add a markup on iOS). For an Android device, follow these instructions (or follow these instructions to add a markup on Android).
Syncing your Procore photo albums with your cloud storage
In almost all organisations, their cloud storage solution is the central source of truth for all photos & albums. One of the strengths of having Procore images stored in cloud storage is that staff can follow the same procedures for file sharing that they follow for all internal files. Through our integration with Dropbox, Google Drive, OneDrive, SharePoint and Microsoft Teams, you can have your Procore Documents and Photos synced across to team folders, client folders or any other internal folder structure. To see if this would be a good fit for your company, speak to our sales team today.


